So after writing that post on Wishing Well inspirations, it has inspired me to get my butt into gear and finish our one. So this post is about the process, choosing and deciding and actually finding the wishing well that I wanted. I managed to get my butt in to gear and finally completed it today, so I'm very very happy with what I've come up with...
After scouring eBay like a hawk for a couple of months, I was coming back from doing something in Rockdale and spotted a large store on the main road that sold things from Bali. I got myself into the driveway without cutting anyone off and went to explore the shop in the hope of finding a bird cage, as I had noticed a lot of the bird cages on eBay came from stores who sourced them from Bali.
And I was in luck. I found a little heavier than I wanted white bird cage which had a white wash type of paint put over it. I originally wanted a black bird cage but then decided that I would find a white one and paint it with black paint. This was priced at $80 which was more than I really wanted to pay for one, but in the long run, the same amount of money I would pay for the cage and postage if I had purchased one off eBay. Best thing was, I could take it home with me that day.
 |
| On the bench in the store after I'd purchased it (my photo) |
It's has a really nice metal twine wrapping round it with leaves, rose buds and butterflies which works its way up to the roof of the cage. And the lid lifts up as it has a hinge on it, it also has a heavy chain on the top of it which you can carry it around with. I've got this image in my head of myself and FH carrying it between the two of us on the way to the Park Hyatt when we leave the reception, might make for a cool photo. Haha.
Since I've brought this one, I've found heaps of cooler and lighter bird cages in shops which were half the price. Why does this happen I always ask myself. Multiple, multiple occurrences with anything I buy, haha. But I do love this one. Especially now that I've painted it black.
I set it up on a polystyrene lid in the kitchen and painted it gradually over a month I think, as the paint fumes where bad at times and I don't really have an outdoor area where I could paint it without getting into trouble with the neighbours. I also found out that if you get acrylic paint on your arms, you can wipe it off with a cotton pad and some nail polish remover. I didn't really want to use turps on my arms as it would dry the skin out rather badly. I purchased the black acrylic paint from Bunnings for about $40 I think and also plan to use it on some of the name signs I've also purchased for the wedding.
 |
| Getting ready for painting in the kitchen (my photo) |
 |
| Half painted, needs a few more final coats (my photo) |
Once it was completely painted, I ordered some
thick red ribbon from my favourite
ribbon seller on eBay and waited for that to arrive. I also purchased some tulle from
Spotlight as I am worried that the cards will fall out of the base of the well, as the gaps are about 1cm wide. So I have decided that I am going to put a strip of folded up tulle around the inside of the base to keep the cards in safely. I had some left over fake red roses from my pomander balls from Smitten Forever Bride which I had made for the ceremony, so thought I could accessorise with them and also found some more realistic ones which would complement it beautifully from
Deb's Hidden Treasures in Taren Point, Sydney. Love that place, well worth a visit if you are looking at decorating your house, they have some amazing stuff. My jaw literally dropped when I walked into the shop a month ago.
 |
| A shot inside Deb's Hidden Treasures, I was so blown away that I had to take a photo (my photo) |
 |
| Left over fake red roses and some new ones, bit dark I know, sorry (my photo) |
 |
| Tulle from Spotlight, Red Ribbon from eBay (my photo) |
So this is what I've come up with so far, with the red ribbon and tulle on the inside bottom. I haven't put the flowers on it yet, but will get around to that soon, as that is where my motivation pretty much dwindled and I got sick of doing wedding creations for a little while.
 |
| Wishing well painted with red ribbon, and thin layer of tulle in the bottom half (my photo) |
Yay, so today, I woke up and thought after cleaning up the bedroom that I would finish the wishing well. I put it on the floor and then sat beside it for a little while trying to work out what I was going to do with it. I found some fur that I had left over and glued it to the base of the birdcage to give it a more plush look.
 |
| Plusher bottom of the cage (my photo) |
Then I scrapped the tulle around the bottom inside and figured that the cards would be big enough and wouldn't fall out. So I then progressed to gluing the fake flowers onto the sides of it.
 |
| Long and short rose on the left side (my photo) |
 |
| Fake flowers on right side (my photo) |
Now that the flowers were attached and looking alright, I decided that I needed something else to finish it off. After looking through my inspiration photos again, I decided to finish it off with a sign saying cards. And are loving my rough typewriter font, it just finished the wishing well off perfectly.
 |
| The card sign in Rough Typewriter font (my photo) |
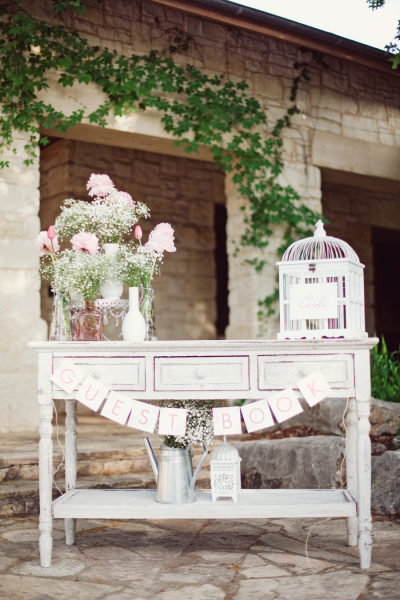
So below are the photos of my finished wishing well/bird cage, I love it to pieces. I skyped a photo through to FH and he was very impressed with what I've created, so I'm rather impressed with myself as well.
 |
| Front View (my photo) |
 |
| Left side view (my photo) |
 |
| Right side view (my photo) |


It looks so beautiful! You must be thrilled :)
ReplyDeleteThank you, I am pretty happy with it. Can't believe how well it turned out :)
DeleteThat looks amazing! Well done :)
ReplyDeleteThank you, I'm glad I got my motivation back and finished it. Another tick off the list! :)
Deletethat looks great and very well in theme with your other creations.
ReplyDeleteThank you very much :)
Deleteoooh I didn't know that place existed.... Love the bird cage
ReplyDeleteYeah definitely check Deb's out, its amazing!. Thanks heaps :)
DeleteYou're so clever! Looks great!
ReplyDelete