I started my cork place cards ages ago as the RVSP's were starting to come in and I thought I should stay ahead of the game and continue to be organised. So started creating my place cards. I had a slight tinge of disappointment as my original idea didn't seem to work, but then when I mocked a place card up, it certainly met with the agreement of myself and my friend who was staying with me at that time.
So we started a cork place card sweat shop in my lounge haha. It was a joke that it was my friend's way of paying her rent as she was staying for a week. She actually helped me with so many things that I was very appreciative of her help. It does make a difference in the rate of things that get down when you have someone else helping. I put my perfection streak to the side and was happy for the help. Anyway back on topic.
I had to wait for a few more cork parcels to arrive from Canada as I kept losing the bidding for the ones in Australia on eBay. Who knew that corks could be so popular, plus I wanted good quality, corks that didn't have red wine stains on them and that had some character to them, like a nice stamp. So it took a little while to accumulate enough, but I sold the duds on eBay which helped to pay for them as well.
So the process to create a cork place card is a little lengthy especially when you have 70-80 of them to make. I'm just glad I don't have hundreds to make, haha.
Step 1: Select the corks that you like and that are the same size as each other. I quickly came to the realisation that corks from Portugal are heaps smaller than the rest of the world. And that the larger corks differ in size as well.
 |
| My Cork Collection (my photo) |
Step 2: Glue two corks together that are the same size. Repeat multiple times....
 |
| Two Corks glued together (my photo) |
|
 |
| Multiplying cork doubles and trusty glue gun (my photo) |
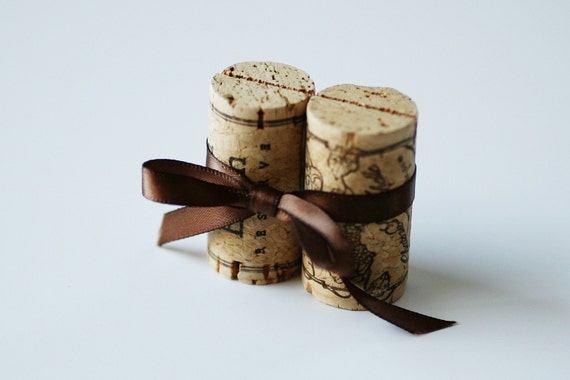
Step 3: Tie a thin ribbon of your choice around the cork and glue it in place. Then fashion your own little bow and glue it onto the ribbon band. I'm not very good at tying bows in ribbon, and it drove me nuts trying to get them to sit in place like the initial picture at the beginning of this post, so I adapted it to what I thought looked good for my style of place card. In the background to the right, you can see a cork with the plain band, waiting for a ribbon to be attached.
 |
| The nearly finished place card with ribbon band and ribbon attached (my photo) |
Step 4: Slice a cut through the top of the corks for the place card to sit. I sliced them about half a cm into the cork so the card wouldn't fall out. Place your made name card into the cork, and there you have it... your place card is finished. Sorry about the black squiggles, just wanted keep my guests private.
 |
| Differing conditions of corks, some had holes and cracks for character (my photo) |
 |
| Different type of corks (my photo) |
 |
| More finished ones (my photo) |
|
So I'm glad now that I've completed all the bases of the place cards. I'm just waiting for the rest of the RSVP's to come in. As people send their RSVP back or text or email me with a yes they are coming. I pop their name into the template that I've made for the name card part and print it, put a black card backing on it and slide it into the cork. So far half of our guest list have RSVP'd which I'm rather happy about as our deadline is September 1.
 |
| The box that lives under the coffee table with completed and waiting place card bases (my photo) |


They look great :-) glad you're happy with them and had some help gluing all those corks together!
ReplyDeleteThank you, it did make it heaps easier having some help. I have to remember to stop being so independent at times haha.
DeleteHow cute! They'll look awesome on your tables for sure!
ReplyDeleteThank you. I initially wasn't sure but they are going to tie in with the sandstone look well.
DeleteAgree with the above comments, these are extremely cute and will look great at the place settings! :)
ReplyDeleteThank you very much
DeleteThese are super cute, what a great idea! I've never seen it done before, but they will look fantastic at your wedding I'm sure. :)
ReplyDeleteThank you Jennifer, thought I'd try something a bit different :)
DeleteNice job with the corks and place cards. We're doing the same thing. We bought all of our corks from portugal, but one of the most time consuming parts was just pairing the corks so that they at best have the same stamp on them or at worst are a similar colour and size.
ReplyDeleteHaha its frustrating aye Sibien, as they are all different sizes. At one point, I went, dam I should of just got the portugal ones as they are smaller and more compact, but I'm glad I stuck with the big ones. My friend decided that I shouldn't use the plain ones as the ones with the stamps on them are much more exciting. I didn't mind if they didn't match in stamps, my problem was having no red wine stains and that they were the right height. Good Luck! :)
Delete